Getting Started with Kubernetes: Deploying and Scaling an Application on AWS
Kubernetes (often abbreviated as K8s) has become the de‑facto standard for orchestrating containerized applications. Modern web services need to be available around the clock, and developers expect to push new versions without downtime. Containerization makes that possible, and Kubernetes helps make sure those containers run where and when they should and have the resources they need. This tutorial walks through the key concepts of Kubernetes, shows how to deploy a simple application on Amazon EKS, and demonstrates how to scale both your application and the underlying infrastructure.
1 Understanding Kubernetes
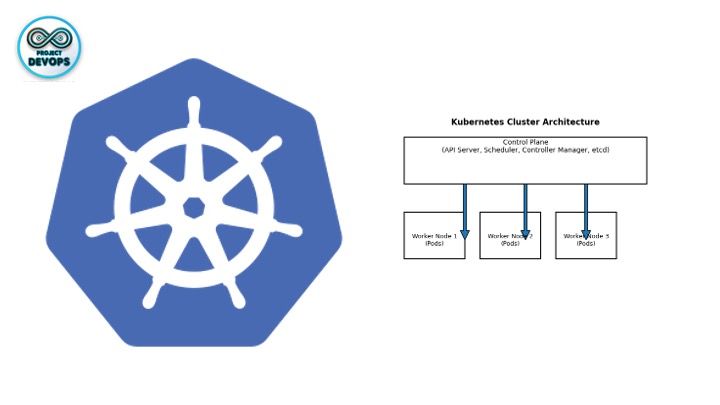
1.1 Cluster architecture
A Kubernetes cluster consists of a control plane and a set of worker nodes that run containerized applications. The control plane hosts components such as the API server, scheduler, controller managers and etcd, which make global decisions for the cluster (for example, scheduling pods). Worker nodes run the pods—the smallest deployable units—that contain one or more containers. This separation lets you add or remove worker nodes without affecting the control plane, enabling high availability and fault tolerance.
Key components include:
kube‑apiserver – exposes the Kubernetes API. It scales horizontally by running multiple instances behind a load balancer.
etcd – the consistent, highly‑available key–value store for all cluster data.
kube‑scheduler – assigns newly created pods to nodes based on resource requirements, policy constraints and scheduling algorithms.
kube‑controller‑manager and cloud‑controller‑manager – run various controllers that handle tasks such as node lifecycles, jobs, endpoints and cloud provider interactions.
kubelet – an agent running on each worker node that ensures containers described in pod specifications are running and healthy.
kube‑proxy – a network proxy on each node that implements the Service abstraction and load‑balances traffic to pods.
1.2 Workloads, pods and deployments
A Deployment manages a set of pods for stateless applications. You describe your desired state (for example, the number of replicas and the container image) in a deployment object, and Kubernetes ensures that reality matches your declaration. Behind the scenes, deployments create and manage ReplicaSets, which in turn manage the individual pods. Deployments enable declarative updates and rollbacks and provide a simple way to scale up or down your application.
The typical workflow for a deployment is:
Define a deployment manifest specifying the container image, number of replicas and labels.
Apply the manifest with kubectl apply -f <file>.
Kubernetes creates a ReplicaSet and schedules pods on nodes.
You can scale or update the deployment declaratively (see section 5).
1.3 Services and load‑balancing
Pods are mortal; they can be destroyed and recreated at any time. Services provide a stable network endpoint to access pods, load‑balancing traffic across all healthy instances. When you expose a deployment via a Service of type LoadBalancer, Kubernetes configures an external load balancer (on AWS this becomes an Elastic Load Balancer) and routes incoming traffic to your pods. This mechanism is essential when running multiple instances of an application.
2 Why Use Amazon EKS?
Operating your own Kubernetes control plane on cloud virtual machines is certainly possible, but it requires ongoing maintenance, upgrades and high‑availability planning. Amazon Elastic Kubernetes Service (EKS) provides a managed control plane that takes care of these responsibilities for you. When you create an EKS cluster, AWS provisions and runs the Kubernetes control plane across multiple Availability Zones, applies security patches and upgrades, and manages critical components such as the API server and etcd. Because EKS integrates with AWS networking and security services—such as IAM, VPC networking and encryption—you can focus on building and deploying your workloads while AWS handles the underlying Kubernetes infrastructure. All that remains under your control are the worker nodes and the applications they run. This managed experience reduces operational overhead and enables you to adopt best practices with minimal effort.
3 Prerequisites and Tooling
Before creating a cluster you need a few prerequisites:
An AWS account with permissions to create EKS clusters and associated resources.
eksctl – a command‑line tool for creating and managing EKS clusters. It automates the provisioning of the control plane and node groups.
kubectl – the Kubernetes command‑line tool used to interact with your cluster for tasks such as applying manifests, inspecting resources and scaling workloads.
Docker – to build and package your application into container images. You’ll also need a container registry, such as Amazon Elastic Container Registry (ECR) or Docker Hub, to store your images.
Install eksctl and kubectl using the instructions provided by AWS and Kubernetes, then verify the installation by running eksctl version and kubectl version on your local machine. A supported programming language runtime (for example, Python or Node.js) is needed to build your application.
4 Creating an EKS Cluster
Create the cluster – Use
eksctlto create a cluster. The following command creates a cluster namedk8s-examplein theeu-west-2region:
eksctl create cluster --name k8s-example --region eu-west-2This command provisions the Kubernetes control plane and an initial node group. Once provisioning completes, eksctl updates your ~/.kube/config file so that kubectl can communicate with the new cluster.
Verify the cluster – After creation, confirm that the cluster is reachable by listing its resources:
kubectl get nodes
kubectl get pods --all-namespaces
kubectl get namespaces
These commands list nodes, pods and namespaces, verifying that the API server is responsive.
Configure AWS credentials – Ensure that your AWS CLI or SDK is configured with credentials that allow cluster creation and management. When you run eksctl, it automatically creates the necessary IAM roles for the control plane and node groups, but the underlying AWS account must have sufficient permissions.
5 Building and Packaging Your Application
To deploy an application on Kubernetes you first need to package it as a container image. For demonstration, assume a simple web service that listens on port 3000. Create a Dockerfile in your project directory:
FROM node:20-alpine
WORKDIR /app
COPY . .
RUN npm install
EXPOSE 3000
CMD ["npm", "start"]
Build and push the image:
docker build -t <your-dockerhub-username>/myapp:1.0 .
docker push <your-dockerhub-username>/myapp:1.0
If you’re using Amazon ECR, login using aws ecr get-login-password, create a repository and push the image there.
6 Defining Kubernetes Manifests
Next, define a Deployment and a Service in a YAML file (for example deployment-example.yaml). The deployment ensures a specified number of pod replicas using your container image, and the service exposes the pods via a load balancer. A sample manifest looks like this:
apiVersion: apps/v1
kind: Deployment
metadata:
  name: myapp-deployment
  namespace: default
  labels:
    app: myapp
spec:
  replicas: 3
  selector:
    matchLabels:
      app: myapp
  template:
    metadata:
      labels:
        app: myapp
    spec:
      containers:
      - name: myapp-container
        image: <your-dockerhub-username>/myapp:1.0
        ports:
        - containerPort: 3000
---
apiVersion: v1
kind: Service
metadata:
  name: myapp-service
  labels:
    app: myapp
spec:
  type: LoadBalancer
  ports:
  - port: 80
    targetPort: 3000
  selector:
    app: myapp
In this example the Deployment runs 3 replicas, and the Service uses type: LoadBalancer. On AWS, this service type provisions an Elastic Load Balancer and routes traffic to your pods automatically. The selector field ensures that only pods with matching labels receive traffic.
7 Deploying the Application
Apply your manifest to the cluster using kubectl:
kubectl apply -f deployment-example.yamlKubernetes creates the Deployment, ReplicaSet, pods and Service accordingly. Verify the status:
kubectl get deployments
kubectl get pods
kubectl get svc
When the Service shows an EXTERNAL-IP, open that IP in a browser to access your application. The load balancer distributes traffic across the pod replicas.
8 Scaling Your Application
8.1 Manual scaling
You can scale a deployment by changing the number of replicas. At creation time you can specify the --replicas flag with kubectl create deployment. Afterwards you can adjust the replica count declaratively by editing the manifest or imperatively using the kubectl scale command. For example, to scale to four replicas:
kubectl scale deployments/myapp-deployment --replicas=4Scaling out a deployment ensures that new pods are created and scheduled on nodes with available resources. If you scale down, Kubernetes terminates excess pods while keeping the service available. Listing the deployment again shows updated READY, UP‑TO‑DATE and AVAILABLE columns.
8.2 Horizontal Pod Autoscaler (HPA)
Manual scaling is useful for predictable workloads, but applications often experience fluctuating demand. The HorizontalPodAutoscaler resource automatically updates a Deployment or StatefulSet to match demand. Horizontal scaling means deploying more pods to handle increased load; vertical scaling (assigning more CPU or memory to existing pods) is a separate concept. The HPA controller runs in the control plane and periodically adjusts the desired scale based on metrics such as average CPU or memory utilization. When load decreases, it scales the deployment back down as long as the number of pods remains above the configured minimum.
To use HPA you need the metrics server installed in your cluster. A simple HPA YAML might look like this:
apiVersion: autoscaling/v2
kind: HorizontalPodAutoscaler
metadata:
  name: myapp-hpa
spec:
  scaleTargetRef:
    apiVersion: apps/v1
    kind: Deployment
    name: myapp-deployment
  minReplicas: 2
  maxReplicas: 10
  metrics:
  - type: Resource
    resource:
      name: cpu
      target:
        type: Utilization
        averageUtilization: 50
This configuration maintains between 2 and 10 replicas, targeting 50 % average CPU utilization across the pods.
8.3 Scaling the underlying infrastructure
Horizontal scaling of pods does not provision additional worker nodes. If your cluster lacks spare capacity, new pods remain in a Pending state. To scale the underlying compute resources automatically you need a Node autoscaler. The Kubernetes community sponsors two autoscalers: Cluster Autoscaler and Karpenter.
Both autoscalers provision additional Nodes for unschedulable Pods and consolidate underutilized Nodes. Their differences lie in how they integrate with the cloud provider and how flexible they are:
Cluster Autoscaler – adds or removes Nodes from pre‑configured Node groups. Node groups usually map to cloud‑provider scaling groups (for example Auto Scaling groups on AWS). A single Cluster Autoscaler instance can manage multiple Node groups and will add Nodes to the group that best fits the resource requests of pending Pods. When consolidating, it selects specific Nodes to remove, rather than simply shrinking the underlying group.
Karpenter – auto‑provisions Nodes based on NodePool (also called Provisioner) configurations defined by the cluster operator. Karpenter handles the entire node lifecycle: it provisions Nodes when pods cannot be scheduled, refreshes them when they reach a certain age and automatically upgrades them when new images are available. Karpenter works directly with individual cloud provider resources and does not rely on pre‑configured Node groups. It supports auto‑provisioning, meaning you specify only constraints and Karpenter chooses appropriate instance types.
Cluster Autoscaler is part of the Kubernetes project and includes cloud provider integrations; Karpenter is published as a library that providers can integrate with. Karpenter currently has fewer provider integrations, but it offers faster scaling and more granular control. You can even run both autoscalers together: Cluster Autoscaler can handle steady‑state workloads, while Karpenter reacts quickly to sudden spikes. Combining a node‑level autoscaler with the Horizontal Pod Autoscaler ensures that your cluster scales pods and nodes in tandem.
9 Cleaning Up
When you finish experimenting, delete the resources to avoid ongoing costs:
kubectl delete -f deployment-example.yaml
eksctl delete cluster --name k8s-example --region eu-west-2
Deleting the cluster removes all associated resources (node groups, VPCs and load balancers). Always verify that no additional AWS resources remain to prevent unexpected charges.
10 Conclusion
In this tutorial you learned:
The fundamental architecture of Kubernetes—including control plane components and worker nodes—and how deployments, pods and services work.
The advantages of Amazon EKS, which provides a managed control plane and integrates tightly with AWS networking and security services.
How to install the necessary tools (eksctl and kubectl), create an EKS cluster, package a simple application into a container image, define Kubernetes manifests and deploy the application on AWS.
How to scale your application manually with kubectl scale, automatically with a Horizontal Pod Autoscaler and scale your node pool using Cluster Autoscaler or Karpenter.
Kubernetes and AWS EKS together provide a powerful, flexible platform for running containerized workloads in production. Starting from a basic deployment, you can layer on services, ingress controllers, continuous integration/continuous delivery (CI/CD) pipelines, observability tools and advanced autoscaling strategies. With a solid understanding of these fundamentals you’re ready to explore more advanced topics such as stateful workloads, service meshes and multi‑cluster deployments.
Comments (0)
No comments yet. Be the first to share your thoughts!